I'm sure all of you love the wonderful children's books written and illustrated by Eric Carle. This is my first lesson using Papa, Please Get the Moon for Me, and the idea was inspired by an image I found on Pinterest credited to Artsy Miss M. If anyone knows her, tell her thanks! This lesson also continues my efforts to include literacy in the art room. The format of this book is very small, so in a larger classroom you may want to read using a smart board or projector.
The children first created their nighttime sky using shades of blue tempera paint and combing patterns into the color. Next we used large lids as tracers for the moon on a second piece of paper. We used white, gray and turquoise paint and added a face to our moon as a finishing touch. Each child was given an index card to create the person trying to get the moon in their collages. I told them to think of the letter H when depicting their person reaching up and climbing the ladder. We used scrap pieces of textured paper to cut and glue all of the parts together. Once a person was complete, we cut away the excess index card.
The moons were cut out and glued to one of the top corners of our sky paper. We used craft sticks and craft glue to adhere our ladder to the composition, and were told to add the ladder to the opposite corner on the bottom. People were then added to the ladder with craft glue as well. Stars were the last cut outs, could be any color but blue, and added anywhere they saw fit. Some children cut out their own stars, which can be quite a challenge, others used a tracer. Enjoy!
Showing posts with label Kindergarten project. Show all posts
Showing posts with label Kindergarten project. Show all posts
Thursday, March 7, 2013
Tuesday, November 13, 2012
Best Artists in the Ocean Paintings
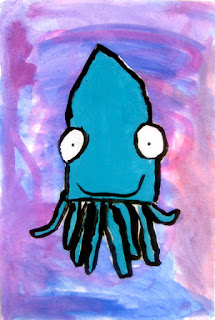
As I continue the unit on literacy in the art room, our young artists read the book 'I'm the Best Artist in the Ocean!' by
Kevin Sherry, and learned about squid, their tentacles and their ability
to squirt ink.
We then created an ocean background using cake tempera and large wash brushes. Next we made a directed line drawing of our artist squids. The pencil drawing was painted with liquid tempera, and then cut out and glued to the background painting. Options for our paintings were to include an artist's cap and/or mustache to the squid character. Younger artists painted solid black lines for the tentacles and older artists created outlines of black filled in when painting the entire body of the squid. I was inspired by fellow bloggers Dali's Moustache and by This Little Class of Mine among others. I hope you enjoy our "Messterpieces!"
We then created an ocean background using cake tempera and large wash brushes. Next we made a directed line drawing of our artist squids. The pencil drawing was painted with liquid tempera, and then cut out and glued to the background painting. Options for our paintings were to include an artist's cap and/or mustache to the squid character. Younger artists painted solid black lines for the tentacles and older artists created outlines of black filled in when painting the entire body of the squid. I was inspired by fellow bloggers Dali's Moustache and by This Little Class of Mine among others. I hope you enjoy our "Messterpieces!"
Monday, October 8, 2012
Lines that Wiggle Monster Collages
I am currently doing a unit on literacy, and reading children's books to inspire art lessons for my youngest artists. For this project we read the book Lines that Wiggle by Candace Whitman, and then stood up and pretended to be different types of lines.
Then they created a collage based on the cover illustration. First they glued pre-cut shapes to create the image of a monster sitting down to a bowl of spaghetti. They used crayons to decorate the table, the bowl, and their monsters. Lastly, they "drew with glue" to create the wiggly lines of spaghetti in the monster's mouth, the bowl and spilling onto the table. After drawing they covered their glue lines with black glitter and added googly eyes. To add skills to this lesson you could make templates to trace and cut the monster, it's mouth and the bowl.
Did I mention that my favorite part of this lesson was getting to hear everyone's pronunciation of the word spaghetti? So cute! Pasketti monsters have a lovely ring, don't you think?
Labels:
children's books,
collage,
Kindergarten project,
line,
monsters
Subscribe to:
Posts (Atom)


