We have been working on a printmaking & collage series in class and have produced some gorgeous cityscape prints. I took this lesson directly from Miss Tabarcea's blog. Her videos are a great lesson in class room management, instruction, incorporating vocabulary and creativity. Thanks to her!
We started by creating the buildings to appear in the background of the city by printing out shapes with matboard scraps dipped in white tempera paint. When dry, we added the foreground buildings in a dark gray. After all buildings were completely dry, we added color to our cityscapes using chalk pastels and blending with Q-tips. I suggested using the brighter/darker colors for the foreground buildings and lighter colors for the background. The kids were truly inventive and added things like water towers, clothing lines, graffiti and people to their images. The addition of color made the works so expressive and full of depth. The printed lines were still visible through the layer of pastels, helping the images to really resonate. Enjoy!
Wednesday, May 26, 2010
Tuesday, May 18, 2010
Warhol Pop Art Portraits
Best class ever! Also the most prep and work outside of class. During an earlier session I had each child pose for some portrait shots with my digital camera. They smiled, were serious, and lastly made a funny face for the camera. Before next class I opened each image in Photoshop, changed them to black and white files, and bumped the contrast way up! I printed them out at home and then took them to my local office supply/copy shop and had multiples of each xeroxed onto business card stock.
I wanted to do them all, but for time and expense we worked on the smiles and the silly faces. We decided as a class that each child would paint one portrait of everyone else in class, then would receive his/her own collection of faces back. For the smiling portraits we worked on just filling the images with large flat areas of color, then when everyone agreed, I allowed them to do whatever they wanted, within reason, and with permission from the other child onto the silly portraits.
We talked about Pop Art, mass media, Andy Warhol, and saw examples of his work. It's crazy to think of a generation who doesn't know who Marilyn Monroe is! But they got the idea. We worked with tempera paint and I showed the students how the toner from the xerox would resist the paint. I thought about trying the project with watercolors, but they might have been a little too pretty. The tempera gave a sense of opacity and mimicked the look of silkscreen successfully.
The kids made a lot of art! We painted a ton of panels and although they were tired toward the end, what an end! After the portraits dried, I trimmed them and mounted each collection onto black poster board. Here are examples from our Andy Warhol gallery.
I wanted to do them all, but for time and expense we worked on the smiles and the silly faces. We decided as a class that each child would paint one portrait of everyone else in class, then would receive his/her own collection of faces back. For the smiling portraits we worked on just filling the images with large flat areas of color, then when everyone agreed, I allowed them to do whatever they wanted, within reason, and with permission from the other child onto the silly portraits.
We talked about Pop Art, mass media, Andy Warhol, and saw examples of his work. It's crazy to think of a generation who doesn't know who Marilyn Monroe is! But they got the idea. We worked with tempera paint and I showed the students how the toner from the xerox would resist the paint. I thought about trying the project with watercolors, but they might have been a little too pretty. The tempera gave a sense of opacity and mimicked the look of silkscreen successfully.
The kids made a lot of art! We painted a ton of panels and although they were tired toward the end, what an end! After the portraits dried, I trimmed them and mounted each collection onto black poster board. Here are examples from our Andy Warhol gallery.
Saturday, May 15, 2010
Van Gogh in Clay
I got this idea from an issue of Family Fun Magazine, in which an art teacher was asked to share her favorite lessons. We used 6x9 art boards, and non-drying modeling clay in primaries, green and white. I thought this idea was brilliant alternative to an actual oil painting. The children get a real tactile sense of it by applying clay to the surface of the board and mixing their own colors by blending the clays together— this also helped it to warm up and become more pliable. My whole family helped to practice this lesson. My husband who is an art director and has a degree in illustration couldn't wait to try it! I always need to try out lessons before I teach them and in doing so have been having so much fun getting messy, and producing art without worrying too much about the final product. I guess the rule about the process being more important than the product can apply to adults as well!
Friday, May 14, 2010
Roman Mosaics
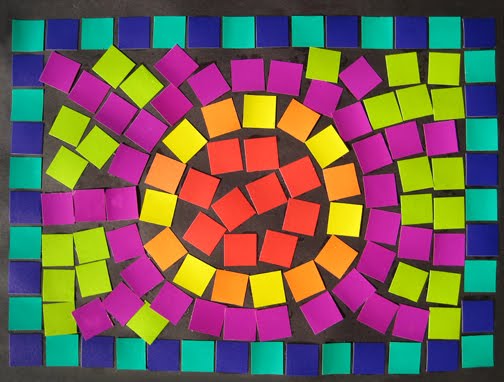
This was a lesson given as part of my World Art classes. We used 9x12 black construction paper, Sobo Glue, glue spreaders, and paper tiles. I purchased the paper tiles at an education supply store— a real time saver for me, and a way to take the monotony out of the lesson. The Sobo Glue seemed to work better than Elmer's. The spreaders and a small plate of glue made it much easier to cover the entire surface of each tile, and not use too much glue at the same time.
Check out my companion blog/site for art lessons at: positivespaceart.blogspot.com
Wednesday, May 12, 2010
Monoprints
Here are a few monoprints that students have done with me. We used tempera paint, brushes, 11x14 white paper, and a 12" roll of aluminum foil. I took this lesson from the Art in Action website. I concentrated on printmaking and design in college, and loved this simple way to communicate this process to children with great results. Rolling 9 inch lengths of foil gives a 9 x 12 image printed onto 11x14 paper. Enjoy!
Tuesday, May 11, 2010
Intro Class
I felt ready to take on a bigger challenge and introduce my art lessons to a larger audience, so my daughters were able to each invite two friends for a sample art class. The girls were excited to act as students and assistants as they shared what they learned in helping me prepare for class. Nothing beats a full table of kids chanting, with brushes in hand—"We want art! We want art!" I let them get it out of their system and we then learned about the process of monoprints. Each child created a series and gained confidence with the materials. It's kind of a magical process, peeling away your paper from the painted plate to reveal how your image's color and brushstrokes melded into the final project. Then we painted a sea life scene after listening to a piece of classical music paired with a painting in the book "Can you Hear It?" by Dr. William Lach. I chose these lessons to accommodate all ages and abilities, and because they were fun, allowed for a lot of freedom, and gave satisfying results.
The layout of supplies was taken from an incredible book titled "Doing Art Together" by Muriel Silberstein-Storfer. Muffin tins hold the paints which prevent spills and give them accessibility to multiple students—BRILLIANT! A small dish with a sponge gives a place for children to dry out their brushes after washing them out in the water jars—no waste, like paper towels.
This first class could not have gone better. The kids were all lovely—eager, attentive, and we all enjoyed ourselves as we learned to make art together.
The layout of supplies was taken from an incredible book titled "Doing Art Together" by Muriel Silberstein-Storfer. Muffin tins hold the paints which prevent spills and give them accessibility to multiple students—BRILLIANT! A small dish with a sponge gives a place for children to dry out their brushes after washing them out in the water jars—no waste, like paper towels.
This first class could not have gone better. The kids were all lovely—eager, attentive, and we all enjoyed ourselves as we learned to make art together.
Monday, May 10, 2010
Mexican Suns and Air Dry Clay
The final projects from this class were so great, but it was a long, hard road of a learning experience to get there! I practiced this class with the girls and found it very troublesome. What surface to work on was a challenge. We tried on wax paper (too flimsy), newsprint (the same and the ink would come off onto everything) and then I pulled out a couple of ceramic floor tiles we had for samples to use in our house. The clay stuck! Nothing was successful! I did a little research and found that a vinyl kitchen table cloth or canvas works best. The kids said that they each get a canvas mat to work on at school. I can't find any real art supply product for this activity, so I'm still wondering what to get.
Working with air dry clay was another challenge. I tried the lesson with Crayola air dry clay, and wasn't too impressed. It broke very easily and some repair work was done to a couple of the projects. Now, I'm working from my home studio, and firing clay and a kiln will never happen, so I need to find a better alternative. And over and over I find that Crayola makes great crayons and markers, but not much else as far as art supplies go.
I found an entry on an online resource by a clay artist who was asked to try out different products and give his opinion. He said that Amaco air-dry was the best product or to use Della Robbia oven bake clay. Any suggestions art teachers?
All in all, the suns were beautiful, and I definitely want to keep clay sculpture in my repertoire. Here are some images. One student loved his so much, he drew it over and over, and made drawings for me to keep as well. That is success!
Working with air dry clay was another challenge. I tried the lesson with Crayola air dry clay, and wasn't too impressed. It broke very easily and some repair work was done to a couple of the projects. Now, I'm working from my home studio, and firing clay and a kiln will never happen, so I need to find a better alternative. And over and over I find that Crayola makes great crayons and markers, but not much else as far as art supplies go.
I found an entry on an online resource by a clay artist who was asked to try out different products and give his opinion. He said that Amaco air-dry was the best product or to use Della Robbia oven bake clay. Any suggestions art teachers?
All in all, the suns were beautiful, and I definitely want to keep clay sculpture in my repertoire. Here are some images. One student loved his so much, he drew it over and over, and made drawings for me to keep as well. That is success!
Subscribe to:
Posts (Atom)